Token classification

The first application we’ll explore is token classification. This generic task encompasses any problem that can be formulated as “attributing a label to each token in a sentence,” such as:
- Named entity recognition (NER): Find the entities (such as persons, locations, or organizations) in a sentence. This can be formulated as attributing a label to each token by having one class per entity and one class for “no entity.”
- Part-of-speech tagging (POS): Mark each word in a sentence as corresponding to a particular part of speech (such as noun, verb, adjective, etc.).
- Chunking: Find the tokens that belong to the same entity. This task (which can be combined with POS or NER) can be formulated as attributing one label (usually
B-) to any tokens that are at the beginning of a chunk, another label (usuallyI-) to tokens that are inside a chunk, and a third label (usuallyO) to tokens that don’t belong to any chunk.
Of course, there are many other types of token classification problem; those are just a few representative examples. In this section, we will fine-tune a model (BERT) on a NER task, which will then be able to compute predictions like this one:
You can find the model we’ll train and upload to the Hub and double-check its predictions here.
Preparing the data
First things first, we need a dataset suitable for token classification. In this section we will use the CoNLL-2003 dataset, which contains news stories from Reuters.
💡 As long as your dataset consists of texts split into words with their corresponding labels, you will be able to adapt the data processing procedures described here to your own dataset. Refer back to Chapter 5 if you need a refresher on how to load your own custom data in a Dataset.
The CoNLL-2003 dataset
To load the CoNLL-2003 dataset, we use the load_dataset() method from the 🤗 Datasets library:
from datasets import load_dataset

raw_datasets = load_dataset("conll2003")
This will download and cache the dataset, like we saw in Chapter 3 for the GLUE MRPC dataset. Inspecting this object shows us the columns present and the split between the training, validation, and test sets:
raw_datasets
DatasetDict({
    train: Dataset({
        features: ['chunk_tags', 'id', 'ner_tags', 'pos_tags', 'tokens'],
        num_rows: 14041
    })
    validation: Dataset({
        features: ['chunk_tags', 'id', 'ner_tags', 'pos_tags', 'tokens'],
        num_rows: 3250
    })
    test: Dataset({
        features: ['chunk_tags', 'id', 'ner_tags', 'pos_tags', 'tokens'],
        num_rows: 3453
    })
})
In particular, we can see the dataset contains labels for the three tasks we mentioned earlier: NER, POS, and chunking. A big difference from other datasets is that the input texts are not presented as sentences or documents, but lists of words (the last column is called tokens, but it contains words in the sense that these are pre-tokenized inputs that still need to go through the tokenizer for subword tokenization).
Let’s have a look at the first element of the training set:
raw_datasets["train"][0]["tokens"]['EU', 'rejects', 'German', 'call', 'to', 'boycott', 'British', 'lamb', '.']Since we want to perform named entity recognition, we will look at the NER tags:
raw_datasets["train"][0]["ner_tags"][3, 0, 7, 0, 0, 0, 7, 0, 0]Those are the labels as integers ready for training, but they’re not necessarily useful when we want to inspect the data. Like for text classification, we can access the correspondence between those integers and the label names by looking at the features attribute of our dataset:
ner_feature = raw_datasets["train"].features["ner_tags"]
ner_featureSequence(feature=ClassLabel(num_classes=9, names=['O', 'B-PER', 'I-PER', 'B-ORG', 'I-ORG', 'B-LOC', 'I-LOC', 'B-MISC', 'I-MISC'], names_file=None, id=None), length=-1, id=None)So this column contains elements that are sequences of ClassLabels. The type of the elements of the sequence is in the feature attribute of this ner_feature, and we can access the list of names by looking at the names attribute of that feature:
label_names = ner_feature.feature.names
label_names
['O', 'B-PER', 'I-PER', 'B-ORG', 'I-ORG', 'B-LOC', 'I-LOC', 'B-MISC', 'I-MISC']We already saw these labels when digging into the token-classification pipeline in Chapter 6, but for a quick refresher:
Omeans the word doesn’t correspond to any entity.B-PER/I-PERmeans the word corresponds to the beginning of/is inside a person entity.B-ORG/I-ORGmeans the word corresponds to the beginning of/is inside an organization entity.B-LOC/I-LOCmeans the word corresponds to the beginning of/is inside a location entity.B-MISC/I-MISCmeans the word corresponds to the beginning of/is inside a miscellaneous entity.
Now decoding the labels we saw earlier gives us this:
words = raw_datasets["train"][0]["tokens"]
labels = raw_datasets["train"][0]["ner_tags"]
line1 = ""
line2 = ""
for word, label in zip(words, labels):
    full_label = label_names[label]
    max_length = max(len(word), len(full_label))
    line1 += word + " " * (max_length - len(word) + 1)
    line2 += full_label + " " * (max_length - len(full_label) + 1)

print(line1)
print(line2)'EU rejects German call to boycott British lamb .'
'B-ORG O B-MISC O O O B-MISC O O'And for an example mixing B- and I- labels, here’s what the same code gives us on the element of the training set at index 4:
'Germany \'s representative to the European Union \'s veterinary committee Werner Zwingmann said on Wednesday consumers should buy sheepmeat from countries other than Britain until the scientific advice was clearer .'
'B-LOC   O  O              O  O   B-ORG    I-ORG O  O          O         B-PER  I-PER     O    O  O         O         O      O   O         O    O         O     O    B-LOC   O     O   O          O      O   O       O'
As we can see, entities spanning two words, like “European Union” and “Werner Zwingmann,” are attributed a B- label for the first word and an I- label for the second.
✏️ Your turn! Print the same two sentences with their POS or chunking labels.
Processing the data
As usual, our texts need to be converted to token IDs before the model can make sense of them. As we saw in Chapter 6, a big difference in the case of token classification tasks is that we have pre-tokenized inputs. Fortunately, the tokenizer API can deal with that pretty easily; we just need to warn the tokenizer with a special flag.
To begin, let’s create our tokenizer object. As we said before, we will be using a BERT pretrained model, so we’ll start by downloading and caching the associated tokenizer:
from transformers import AutoTokenizer

model_checkpoint = "bert-base-cased"
tokenizer = AutoTokenizer.from_pretrained(model_checkpoint)
You can replace the model_checkpoint with any other model you prefer from the Hub, or with a local folder in which you’ve saved a pretrained model and a tokenizer. The only constraint is that the tokenizer needs to be backed by the 🤗 Tokenizers library, so there’s a “fast” version available. You can see all the architectures that come with a fast version in this big table, and to check that the tokenizer object you’re using is indeed backed by 🤗 Tokenizers you can look at its is_fast attribute:
tokenizer.is_fast
TrueTo tokenize a pre-tokenized input, we can use our tokenizer as usual and just add is_split_into_words=True:
inputs = tokenizer(raw_datasets["train"][0]["tokens"], is_split_into_words=True)
inputs.tokens()['[CLS]', 'EU', 'rejects', 'German', 'call', 'to', 'boycott', 'British', 'la', '##mb', '.', '[SEP]']As we can see, the tokenizer added the special tokens used by the model ([CLS] at the beginning and [SEP] at the end) and left most of the words untouched. The word lamb, however, was tokenized into two subwords, la and ##mb. This introduces a mismatch between our inputs and the labels: the list of labels has only 9 elements, whereas our input now has 12 tokens. Accounting for the special tokens is easy (we know they are at the beginning and the end), but we also need to make sure we align all the labels with the proper words.
Fortunately, because we’re using a fast tokenizer we have access to the 🤗 Tokenizers superpowers, which means we can easily map each token to its corresponding word (as seen in Chapter 6):
inputs.word_ids()
[None, 0, 1, 2, 3, 4, 5, 6, 7, 7, 8, None]With a tiny bit of work, we can then expand our label list to match the tokens. The first rule we’ll apply is that special tokens get a label of -100. This is because by default -100 is an index that is ignored in the loss function we will use (cross entropy). Then, each token gets the same label as the token that started the word it’s inside, since they are part of the same entity. For tokens inside a word but not at the beginning, we replace the B- with I- (since the token does not begin the entity):
def align_labels_with_tokens(labels, word_ids):
    new_labels = []
    current_word = None
    for word_id in word_ids:
        if word_id != current_word:
            # Start of a new word!
            current_word = word_id
            label = -100 if word_id is None else labels[word_id]
            new_labels.append(label)
        elif word_id is None:
            # Special token
            new_labels.append(-100)
        else:
            # Same word as previous token
            label = labels[word_id]
            # If the label is B-XXX we change it to I-XXX
            if label % 2 == 1:
                label += 1
            new_labels.append(label)

    return new_labels
Let’s try it out on our first sentence:
labels = raw_datasets["train"][0]["ner_tags"]
word_ids = inputs.word_ids()
print(labels)
print(align_labels_with_tokens(labels, word_ids))[3, 0, 7, 0, 0, 0, 7, 0, 0]
[-100, 3, 0, 7, 0, 0, 0, 7, 0, 0, 0, -100]As we can see, our function added the -100 for the two special tokens at the beginning and the end, and a new 0 for our word that was split into two tokens.
✏️ Your turn! Some researchers prefer to attribute only one label per word, and assign -100 to the other subtokens in a given word. This is to avoid long words that split into lots of subtokens contributing heavily to the loss. Change the previous function to align labels with input IDs by following this rule.
To preprocess our whole dataset, we need to tokenize all the inputs and apply align_labels_with_tokens() on all the labels. To take advantage of the speed of our fast tokenizer, it’s best to tokenize lots of texts at the same time, so we’ll write a function that processes a list of examples and use the Dataset.map() method with the option batched=True. The only thing that is different from our previous example is that the word_ids() function needs to get the index of the example we want the word IDs of when the inputs to the tokenizer are lists of texts (or in our case, list of lists of words), so we add that too:
def tokenize_and_align_labels(examples):
    tokenized_inputs = tokenizer(
        examples["tokens"], truncation=True, is_split_into_words=True
    )
    all_labels = examples["ner_tags"]
    new_labels = []
    for i, labels in enumerate(all_labels):
        word_ids = tokenized_inputs.word_ids(i)
        new_labels.append(align_labels_with_tokens(labels, word_ids))

    tokenized_inputs["labels"] = new_labels
    return tokenized_inputs
Note that we haven’t padded our inputs yet; we’ll do that later, when creating the batches with a data collator.
We can now apply all that preprocessing in one go on the other splits of our dataset:
tokenized_datasets = raw_datasets.map(
    tokenize_and_align_labels,
    batched=True,
    remove_columns=raw_datasets["train"].column_names,
)
We’ve done the hardest part! Now that the data has been preprocessed, the actual training will look a lot like what we did in Chapter 3.
Fine-tuning the model with the Trainer API
The actual code using the Trainer will be the same as before; the only changes are the way the data is collated into a batch and the metric computation function.
Data collation
We can’t just use a DataCollatorWithPadding like in Chapter 3 because that only pads the inputs (input IDs, attention mask, and token type IDs). Here our labels should be padded the exact same way as the inputs so that they stay the same size, using -100 as a value so that the corresponding predictions are ignored in the loss computation.
This is all done by a DataCollatorForTokenClassification. Like the DataCollatorWithPadding, it takes the tokenizer used to preprocess the inputs:
from transformers import DataCollatorForTokenClassification

data_collator = DataCollatorForTokenClassification(tokenizer=tokenizer)
To test this on a few samples, we can just call it on a list of examples from our tokenized training set:
batch = data_collator([tokenized_datasets["train"][i] for i in range(2)])
batch["labels"]tensor([[-100, 3, 0, 7, 0, 0, 0, 7, 0, 0, 0, -100],
[-100, 1, 2, -100, -100, -100, -100, -100, -100, -100, -100, -100]])Let’s compare this to the labels for the first and second elements in our dataset:
for i in range(2):
print(tokenized_datasets["train"][i]["labels"])[-100, 3, 0, 7, 0, 0, 0, 7, 0, 0, 0, -100]
[-100, 1, 2, -100]As we can see, the second set of labels has been padded to the length of the first one using -100s.
Metrics
To have the Trainer compute a metric every epoch, we will need to define a compute_metrics() function that takes the arrays of predictions and labels, and returns a dictionary with the metric names and values.
The traditional framework used to evaluate token classification prediction is seqeval. To use this metric, we first need to install the seqeval library:
!pip install seqeval
We can then load it via the evaluate.load() function like we did in Chapter 3:
import evaluate

metric = evaluate.load("seqeval")
This metric does not behave like the standard accuracy: it will actually take the lists of labels as strings, not integers, so we will need to fully decode the predictions and labels before passing them to the metric. Let’s see how it works. First, we’ll get the labels for our first training example:
labels = raw_datasets["train"][0]["ner_tags"]
labels = [label_names[i] for i in labels]
labels['B-ORG', 'O', 'B-MISC', 'O', 'O', 'O', 'B-MISC', 'O', 'O']We can then create fake predictions for those by just changing the value at index 2:
predictions = labels.copy()
predictions[2] = "O"
metric.compute(predictions=[predictions], references=[labels])
Note that the metric takes a list of predictions (not just one) and a list of labels. Here’s the output:
{'MISC': {'precision': 1.0, 'recall': 0.5, 'f1': 0.67, 'number': 2},
'ORG': {'precision': 1.0, 'recall': 1.0, 'f1': 1.0, 'number': 1},
'overall_precision': 1.0,
'overall_recall': 0.67,
'overall_f1': 0.8,
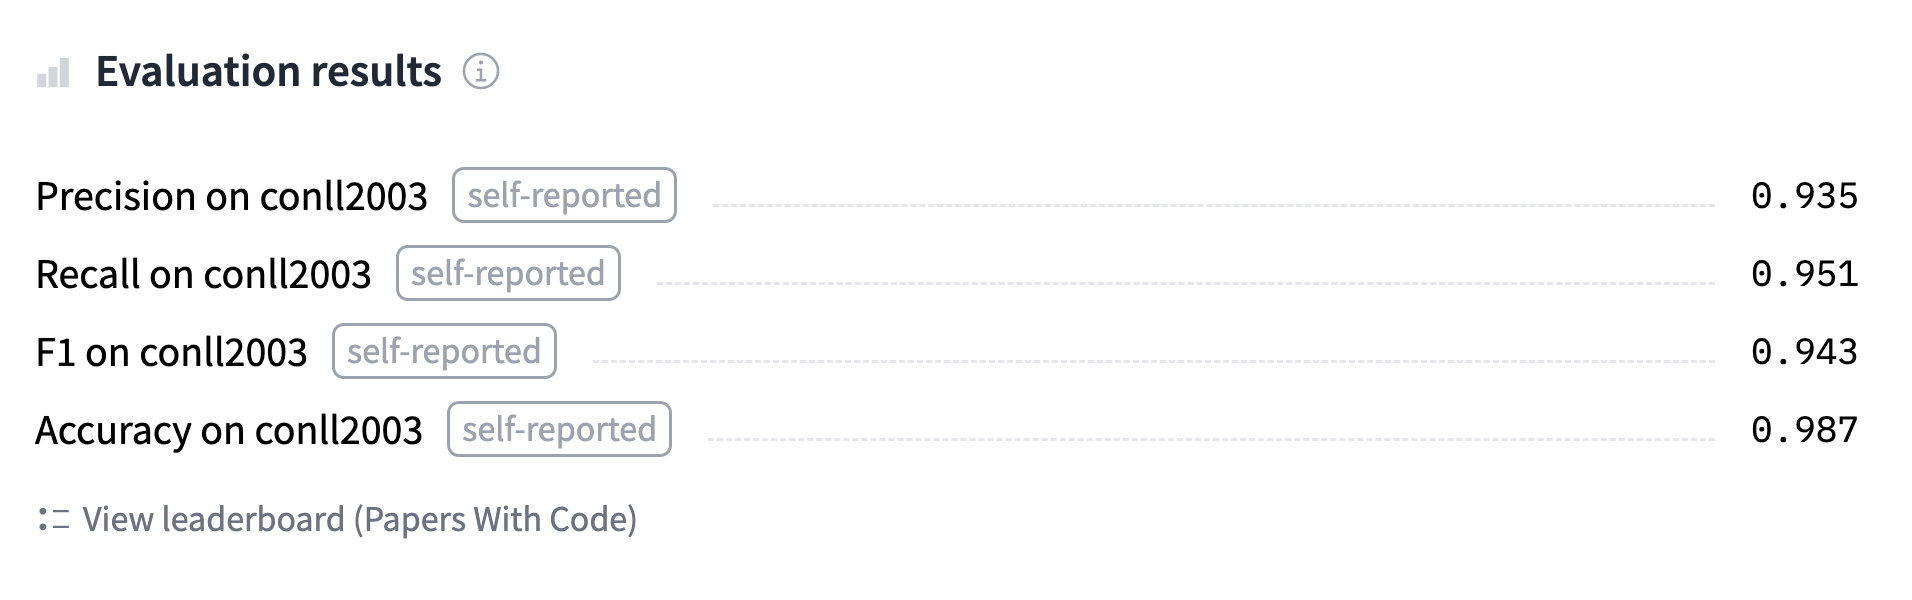
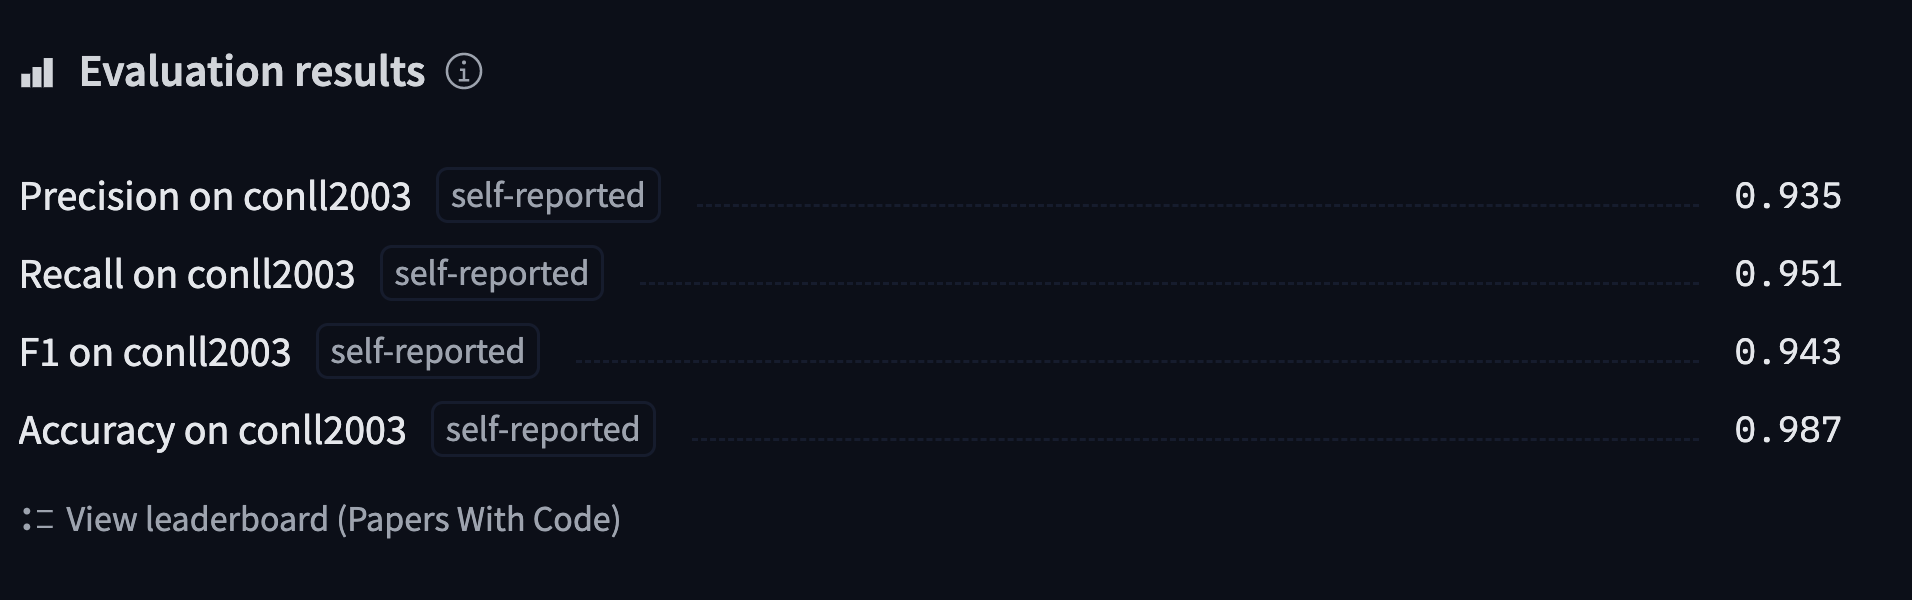
'overall_accuracy': 0.89}This is sending back a lot of information! We get the precision, recall, and F1 score for each separate entity, as well as overall. For our metric computation we will only keep the overall score, but feel free to tweak the compute_metrics() function to return all the metrics you would like reported.
This compute_metrics() function first takes the argmax of the logits to convert them to predictions (as usual, the logits and the probabilities are in the same order, so we don’t need to apply the softmax). Then we have to convert both labels and predictions from integers to strings. We remove all the values where the label is -100, then pass the results to the metric.compute() method:
import numpy as np


def compute_metrics(eval_preds):
    logits, labels = eval_preds
    predictions = np.argmax(logits, axis=-1)

    # Remove ignored index (special tokens) and convert to labels
    true_labels = [[label_names[l] for l in label if l != -100] for label in labels]
    true_predictions = [
        [label_names[p] for (p, l) in zip(prediction, label) if l != -100]
        for prediction, label in zip(predictions, labels)
    ]
    all_metrics = metric.compute(predictions=true_predictions, references=true_labels)
    return {
        "precision": all_metrics["overall_precision"],
        "recall": all_metrics["overall_recall"],
        "f1": all_metrics["overall_f1"],
        "accuracy": all_metrics["overall_accuracy"],
    }
Now that this is done, we are almost ready to define our Trainer. We just need a model to fine-tune!
Defining the model
Since we are working on a token classification problem, we will use the AutoModelForTokenClassification class. The main thing to remember when defining this model is to pass along some information on the number of labels we have. The easiest way to do this is to pass that number with the num_labels argument, but if we want a nice inference widget working like the one we saw at the beginning of this section, it’s better to set the correct label correspondences instead.
They should be set by two dictionaries, id2label and label2id, which contain the mappings from ID to label and vice versa:
id2label = {i: label for i, label in enumerate(label_names)}
label2id = {v: k for k, v in id2label.items()}
Now we can just pass them to the AutoModelForTokenClassification.from_pretrained() method, and they will be set in the model’s configuration and then properly saved and uploaded to the Hub:
from transformers import AutoModelForTokenClassification

model = AutoModelForTokenClassification.from_pretrained(
    model_checkpoint,
    id2label=id2label,
    label2id=label2id,
)
Like when we defined our AutoModelForSequenceClassification in Chapter 3, creating the model issues a warning that some weights were not used (the ones from the pretraining head) and some other weights are randomly initialized (the ones from the new token classification head), and that this model should be trained. We will do that in a minute, but first let’s double-check that our model has the right number of labels:
model.config.num_labels
9⚠️ If you have a model with the wrong number of labels, you will get an obscure error when calling the Trainer.train() method later on (something like “CUDA error: device-side assert triggered”). This is the number one cause of bugs reported by users for such errors, so make sure you do this check to confirm that you have the expected number of labels.
Fine-tuning the model
We are now ready to train our model! We just need to do two last things before we define our Trainer: log in to Hugging Face and define our training arguments. If you’re working in a notebook, there’s a convenience function to help you with this:
from huggingface_hub import notebook_login

notebook_login()
This will display a widget where you can enter your Hugging Face login credentials.
If you aren’t working in a notebook, just type the following line in your terminal:
huggingface-cli login
Once this is done, we can define our TrainingArguments:
from transformers import TrainingArguments

args = TrainingArguments(
    "bert-finetuned-ner",
    evaluation_strategy="epoch",
    save_strategy="epoch",
    learning_rate=2e-5,
    num_train_epochs=3,
    weight_decay=0.01,
    push_to_hub=True,
)
You’ve seen most of those before: we set some hyperparameters (like the learning rate, the number of epochs to train for, and the weight decay), and we specify push_to_hub=True to indicate that we want to save the model and evaluate it at the end of every epoch, and that we want to upload our results to the Model Hub. Note that you can specify the name of the repository you want to push to with the hub_model_id argument (in particular, you will have to use this argument to push to an organization). For instance, when we pushed the model to the huggingface-course organization, we added hub_model_id="huggingface-course/bert-finetuned-ner" to TrainingArguments. By default, the repository used will be in your namespace and named after the output directory you set, so in our case it will be "sgugger/bert-finetuned-ner".
💡 If the output directory you are using already exists, it needs to be a local clone of the repository you want to push to. If it isn’t, you’ll get an error when defining your Trainer and will need to set a new name.
Finally, we just pass everything to the Trainer and launch the training:
from transformers import Trainer

trainer = Trainer(
    model=model,
    args=args,
    train_dataset=tokenized_datasets["train"],
    eval_dataset=tokenized_datasets["validation"],
    data_collator=data_collator,
    compute_metrics=compute_metrics,
    tokenizer=tokenizer,
)
trainer.train()
Note that while the training happens, each time the model is saved (here, every epoch) it is uploaded to the Hub in the background. This way, you will be able to to resume your training on another machine if necessary.
Once the training is complete, we use the push_to_hub() method to make sure we upload the most recent version of the model:
trainer.push_to_hub(commit_message="Training complete")This command returns the URL of the commit it just did, if you want to inspect it:
'https://huggingface.co/sgugger/bert-finetuned-ner/commit/26ab21e5b1568f9afeccdaed2d8715f571d786ed'The Trainer also drafts a model card with all the evaluation results and uploads it. At this stage, you can use the inference widget on the Model Hub to test your model and share it with your friends. You have successfully fine-tuned a model on a token classification task — congratulations!
If you want to dive a bit more deeply into the training loop, we will now show you how to do the same thing using 🤗 Accelerate.
A custom training loop
Let’s now take a look at the full training loop, so you can easily customize the parts you need. It will look a lot like what we did in Chapter 3, with a few changes for the evaluation.
Preparing everything for training
First we need to build the DataLoaders from our datasets. We’ll reuse our data_collator as a collate_fn and shuffle the training set, but not the validation set:
from torch.utils.data import DataLoader

train_dataloader = DataLoader(
    tokenized_datasets["train"],
    shuffle=True,
    collate_fn=data_collator,
    batch_size=8,
)
eval_dataloader = DataLoader(
    tokenized_datasets["validation"], collate_fn=data_collator, batch_size=8
)
Next we reinstantiate our model, to make sure we’re not continuing the fine-tuning from before but starting from the BERT pretrained model again:
model = AutoModelForTokenClassification.from_pretrained(
    model_checkpoint,
    id2label=id2label,
    label2id=label2id,
)
Then we will need an optimizer. We’ll use the classic AdamW, which is like Adam, but with a fix in the way weight decay is applied:
from torch.optim import AdamW

optimizer = AdamW(model.parameters(), lr=2e-5)
Once we have all those objects, we can send them to the accelerator.prepare() method:
from accelerate import Accelerator

accelerator = Accelerator()
model, optimizer, train_dataloader, eval_dataloader = accelerator.prepare(
    model, optimizer, train_dataloader, eval_dataloader
)
🚨 If you’re training on a TPU, you’ll need to move all the code starting from the cell above into a dedicated training function. See Chapter 3 for more details.
Now that we have sent our train_dataloader to accelerator.prepare(), we can use its length to compute the number of training steps. Remember that we should always do this after preparing the dataloader, as that method will change its length. We use a classic linear schedule from the learning rate to 0:
from transformers import get_scheduler

num_train_epochs = 3
num_update_steps_per_epoch = len(train_dataloader)
num_training_steps = num_train_epochs * num_update_steps_per_epoch

lr_scheduler = get_scheduler(
    "linear",
    optimizer=optimizer,
    num_warmup_steps=0,
    num_training_steps=num_training_steps,
)
Lastly, to push our model to the Hub, we will need to create a Repository object in a working folder. First log in to Hugging Face, if you’re not logged in already. We’ll determine the repository name from the model ID we want to give our model (feel free to replace the repo_name with your own choice; it just needs to contain your username, which is what the function get_full_repo_name() does):
from huggingface_hub import Repository, get_full_repo_name

model_name = "bert-finetuned-ner-accelerate"
repo_name = get_full_repo_name(model_name)
repo_name'sgugger/bert-finetuned-ner-accelerate'Then we can clone that repository in a local folder. If it already exists, this local folder should be an existing clone of the repository we are working with:
output_dir = "bert-finetuned-ner-accelerate"
repo = Repository(output_dir, clone_from=repo_name)
We can now upload anything we save in output_dir by calling the repo.push_to_hub() method. This will help us upload the intermediate models at the end of each epoch.
Training loop
We are now ready to write the full training loop. To simplify its evaluation part, we define this postprocess() function that takes predictions and labels and converts them to lists of strings, like our metric object expects:
def postprocess(predictions, labels):
    predictions = predictions.detach().cpu().clone().numpy()
    labels = labels.detach().cpu().clone().numpy()

    # Remove ignored index (special tokens) and convert to labels
    true_labels = [[label_names[l] for l in label if l != -100] for label in labels]
    true_predictions = [
        [label_names[p] for (p, l) in zip(prediction, label) if l != -100]
        for prediction, label in zip(predictions, labels)
    ]
    return true_labels, true_predictions
Then we can write the training loop. After defining a progress bar to follow how training goes, the loop has three parts:
- The training in itself, which is the classic iteration over the
train_dataloader, forward pass through the model, then backward pass and optimizer step. - The evaluation, in which there is a novelty after getting the outputs of our model on a batch: since two processes may have padded the inputs and labels to different shapes, we need to use
accelerator.pad_across_processes()to make the predictions and labels the same shape before calling thegather()method. If we don’t do this, the evaluation will either error out or hang forever. Then we send the results tometric.add_batch()and callmetric.compute()once the evaluation loop is over. - Saving and uploading, where we first save the model and the tokenizer, then call
repo.push_to_hub(). Notice that we use the argumentblocking=Falseto tell the 🤗 Hub library to push in an asynchronous process. This way, training continues normally and this (long) instruction is executed in the background.
Here’s the complete code for the training loop:
from tqdm.auto import tqdm
import torch

progress_bar = tqdm(range(num_training_steps))

for epoch in range(num_train_epochs):
    # Training
    model.train()
    for batch in train_dataloader:
        outputs = model(**batch)
        loss = outputs.loss
        accelerator.backward(loss)

        optimizer.step()
        lr_scheduler.step()
        optimizer.zero_grad()
        progress_bar.update(1)

    # Evaluation
    model.eval()
    for batch in eval_dataloader:
        with torch.no_grad():
            outputs = model(**batch)

        predictions = outputs.logits.argmax(dim=-1)
        labels = batch["labels"]

        # Necessary to pad predictions and labels for being gathered
        predictions = accelerator.pad_across_processes(predictions, dim=1, pad_index=-100)
        labels = accelerator.pad_across_processes(labels, dim=1, pad_index=-100)

        predictions_gathered = accelerator.gather(predictions)
        labels_gathered = accelerator.gather(labels)

        true_predictions, true_labels = postprocess(predictions_gathered, labels_gathered)
        metric.add_batch(predictions=true_predictions, references=true_labels)

    results = metric.compute()
    print(
        f"epoch {epoch}:",
        {
            key: results[f"overall_{key}"]
            for key in ["precision", "recall", "f1", "accuracy"]
        },
    )

    # Save and upload
    accelerator.wait_for_everyone()
    unwrapped_model = accelerator.unwrap_model(model)
    unwrapped_model.save_pretrained(output_dir, save_function=accelerator.save)
    if accelerator.is_main_process:
        tokenizer.save_pretrained(output_dir)
        repo.push_to_hub(
            commit_message=f"Training in progress epoch {epoch}", blocking=False
        )
In case this is the first time you’re seeing a model saved with 🤗 Accelerate, let’s take a moment to inspect the three lines of code that go with it:
accelerator.wait_for_everyone()
unwrapped_model = accelerator.unwrap_model(model)
unwrapped_model.save_pretrained(output_dir, save_function=accelerator.save)
The first line is self-explanatory: it tells all the processes to wait until everyone is at that stage before continuing. This is to make sure we have the same model in every process before saving. Then we grab the unwrapped_model, which is the base model we defined. The accelerator.prepare() method changes the model to work in distributed training, so it won’t have the save_pretrained() method anymore; the accelerator.unwrap_model() method undoes that step. Lastly, we call save_pretrained() but tell that method to use accelerator.save() instead of torch.save().
Once this is done, you should have a model that produces results pretty similar to the one trained with the Trainer. You can check the model we trained using this code at huggingface-course/bert-finetuned-ner-accelerate. And if you want to test out any tweaks to the training loop, you can directly implement them by editing the code shown above!
Using the fine-tuned model
We’ve already shown you how you can use the model we fine-tuned on the Model Hub with the inference widget. To use it locally in a pipeline, you just have to specify the proper model identifier:
from transformers import pipeline

# Replace this with your own checkpoint
model_checkpoint = "huggingface-course/bert-finetuned-ner"
token_classifier = pipeline(
    "token-classification", model=model_checkpoint, aggregation_strategy="simple"
)
token_classifier("My name is Sylvain and I work at Hugging Face in Brooklyn.")[{'entity_group': 'PER', 'score': 0.9988506, 'word': 'Sylvain', 'start': 11, 'end': 18},
{'entity_group': 'ORG', 'score': 0.9647625, 'word': 'Hugging Face', 'start': 33, 'end': 45},
{'entity_group': 'LOC', 'score': 0.9986118, 'word': 'Brooklyn', 'start': 49, 'end': 57}]Great! Our model is working as well as the default one for this pipeline!